Steps In MTP Post-Campaign Data Analysis
MJ Mahoney
Last Revision: July 15, 2008
6. Fill in LR1, LR2 and Zb
in MISSION_RAOBrangeAll.txt and Create the MISSION_RAOBs.RAOB2 File
Before OATnavCOR and a Window
Correction Table can be calculated, one
file (MISSION_RAOBrangeAll.txt) needs
to be filled with sounding extension information, and a second file
needs to be created (MISSION_RAOBs.RAOB2).
The latter file contains all the radiosondes that were launched before
and after an aircraft flies by a radiosonde launch site. Although not
essential, it also should contain a few earlier and later sounding to
make it more convenient to check during data processing for
temporal variability in the sites temperature field. Typically 24 hours
before and after flyby should be included; that is, two soundings
before and two soundings after the time of closest approach.
The easiest way to enter the sounding extension information (LR1, LR2,
and Zb) is to import the MISSION_RAOBrangeAll.txt
file
(that was created using the MTPbin|Tools| Run Pgm tab in Step 5) into an
Excel spreadsheet using the following steps:
- Open a blank Excel spreadsheet
- On the menu bar, use File/Open
to
navigate to the MISSION
folder
- Select All Files so
that the MISSION_RAOBrangeAll.txt
file will be visible
to open
- On the Text Import Wizard -
Step 1
of
3 select the Delimited
option in
the Original Data Type frame
(rather than Fixed Width) as
the file is
tab delimited.
- Click Next
- Check the Tab check box in
the Delimiters frame
- Click the Finish button
The result of these steps is shown in Figure
1 below. The reason that we import the MISSION_RAOBrangeAll.txt file into a
spreadsheet is that is is easier to enter the RAOB extension
information into a spreadsheet than into a text file. After this has
been done, the spreadsheet will be saved in the mission /RAOB/ folder as MISSION_RAOBrangeAll.xls and it will
also be saved as MISSION_RAOBrangeAll.txt;
the latter because several programs use this file. I will use the two
names interchangeably. Just remember that the xls-file is where
editting is done, but that it must always be saved in the txt-file
because that's where the programs get their lapse rate extension
information.

Figure 1. The PAVE_ROABrangeAll.txt file imported
into an Excel spreadsheet.
To figure out which values should be used for LR1, LR2, and Zb, we need
to look at the soundings using the program RAOBman. (Recall that in the MISSION_RAOBrangeAll.txt file there
are
two soundings provided for each flyby to allow for spatial
interpolation between two sounding launch sites. Unlike temporal
interpolation, which is fully automated, spatial interpolation can only
be done manually. Because this is so tedious, spatial interpolation is
not currently supported. As a result, the PAVE_RAOBrangeAll.txt file shown in Figure 1 shows redundant
information. Once spatial interpolation is implemented, the information
in columns E:G and H:J, K and L, and M and N will be different. That's
why LR1, LR2 and Zb are labelled LR11, LR12, and ZB1 in columns E:G
(for the first RAOB site used in a spatial interpolation), and LR21,
LR22, ZB2 in columns H:J (for the second RAOB site used in a spatial
interpolation).
It shouldn't be surprising that a number of things need to be done
before subsequent calibration steps can be undertaken. In Step 5, we
discussed the generation of two binary RAOB files:
- the MISSION_All.RAOB2
file, which contains the tens of thousands of radiosondes collected
during the
campaign and from archives that will be used to calculate retrieval
coefficients, and
- the smaller MISSION_Campaign.RAOB2
file which contains only radionsondes launched during the campaign that
will be used to select template soundings to calculate retrieval
coefficients.
Finally, to speed up data processing, we need to create the MISSION_RAOBs.RAOB2 file, which
contains only the RAOBs needed for spatial and temporal interpolation.
It is a very small subset of the MISSION_Campaign.RAOB2
file. To create this file, we need the information in the MISSION_RAOBrangeAll.txt
file that was opened in an Excel spreadsheet (see Figure 1). Since it
contains all the radiosonde launch
sites that the aircraft flew close to, we can use it to figure out
which soundings to put in the MISSION_RAOBs.RAOB2
file. The simplest way to proceed
is day by day. We will use the PAVE campaign as
an example. The
first PAVE test flight was on January 14, 2005, and the PAVE_RAOBrangeAll.txt
file shows that three radiosonde launch site were flown close to:
Edwards AFB (EDW), Vandenburg AFB (VBG), and Miramar NAS (NKX).

Figure 2. RAOBman Filters tab.
Therefore, as shown if Figure 2,
type EDW in the Site text box
of the Site frame of the RAOBman Filters tab and depress the Return key or Add button to enter it into the
Site list box. Repeat this
step for VBG and NKX to obtain the results
shown in Figure 2. Then, in
the Time
frame enter a period of time that includes two sonde launch times prior
to takeoff and two after landing. Even though only the sondes
immediately before takeoff and after landing will be used (if they
exist!), we want two before and after in order to check for temporal
variability (as discussed above) and as backups in case the immediately
before and after
sondes don't exist or burst at too low an altitude.

Figure 3. RAOBman Select tab.
Next depress the Clear List
button on the RAOBman Select tab (if necessary), and
depress the Search button.
The results of the search are shown in Figure
3. Sixteen soundings were found for EDW, VBG and NKX for the
requested time window specified on the Filters tab (see Figure 2).

Figure 4. RAOBman Select tab.
Next, for each launch site flyby select the before and after soundings.
In the example given in Figure 4,
we have chosen sondes that were launch at 0000UT and 0300UT which
bracketed the EDW flyby time (just after 0000UT) on January 15, 2005.
Make sure that the Plot Multiple
Scans check box (near the top middle) is check so that selected
soundings will be overlayed in the RAOB plot form (Figure 5).
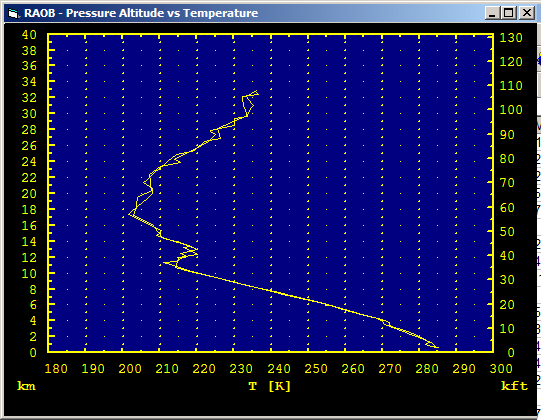
Figure 5. Two EDW soundings at
0000UT and 0300UT on January 15, 2005.
The two EDW soundings are shown in Figure
5.
This would be an example of when there was not a significant temporal
variability over a 3 hour period of time throughout most of the
temperature field. Since this was a short 4-hour
test flight, all the flying time at altitude (where comparisons are
made) was between 0000UT and
0300UT. If it was not, an earlier or later sounding would have
been
needed as well.
If the chosen soundings do not
completely cover the flight time period (that is, takeoff to landing),
the software will not run properly, since it assumes that before
and after soundings always exist in the MISSION_RAOBs.ROAB2
file! Although these two EDW soundings are similar, there are some
substantial differences. For example, the temperature at the tropopause
near 11 km changed by >4 K. For this reason data near the
tropopause should not be used for calculating OATnavCOR (see next
step). Another rule
of thumb is to avoid regions in the atmosphere where the lapse rate is
large, since aircraft altitude excursions will introduce much larger
errors than altitude regions where the temperature is nearly
isothermal. There are several parameters that can be set when RAOB and
MTP retrievals are compared to help mitigate some of these issues, and
they will be described shortly.

Figure 6. RAOBman I/O tab.
Before moving on to the next launch site for this flight (NKX), we need
to do two things:
- Enter LR1, LR2, and Zb information into the PAVE_ROABrangeAll.txt spreadsheet.
Examining Figure 5, we see
that both soundings got above 30 km, so we
set LR1 = 0 K/km (since it will never be needed), Zb = 22 km (because
that is where the lapse rate changes or breaks), and LR2 = 2.0 K/km
above Zb. Save the
file and move on to the next flyby for this flight. By default the
txt-file will be saved as Text (Tab Delimited), which is what you want.
When
we are done, we will also save the file as an Excel file named MISSION_RAOBrangeAll.xls.
- Copy these two EDW soundings to the MISSION_RAOBs.RAOB2 file. To do
this, make sure that the Random RAOB
Output frame of the RAOBman I/O tab has the correct filename;
in this case, C:\MTP\RAOB\PAVE\PAVE_Campaign.RAOB2.
Also, if this is the first time that file is being written to, make
sure that the New File Mode
option box is selected on the Random
RAOB Output frame; otherwise, the soundings will be appended to
an
existing file of the same name if there is one. This done, return to
the Select tab
(Figure 4) and depress the Write
button. (Note that by default
the WriteAvg check box is not
selected. If it was, the average temperature profile of all the
soundings in Search list box
would be written to the Export Path
text box on the Export tab. A
Tooltip will tell you where the file is being written.)

Figure 6. RAOBman I/O tab.
We continue like this for the other sounding site flybys for the
flights of January 14, 2005, and January 18, 2005, being sure to enter
the LR1, LR2 and Zb information into PAVE_ROABrangeAll.txt
spreadsheet, and to save the selected soundings that cover the
flight time into PAVE_RAOBs.RAOB2.
As shown in Figure 6, the I/O
tab Random RAOB Output frame
Mode option should be changed to Append
all binary RAOB writes after the first.

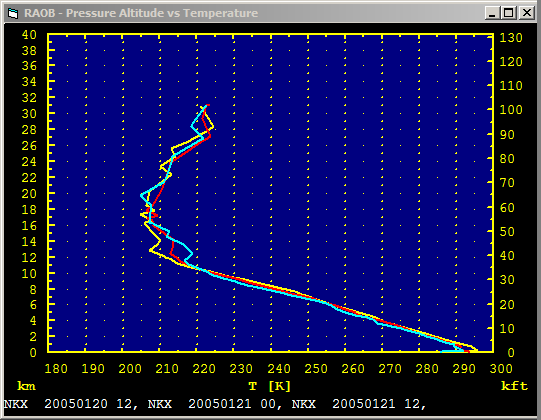
Figure 7. The RAOBman Select tab.
Our next example is for the January 20, 2005 flyby of Miramar NAS
(NKX). There were 4 flybys within 10 km of NKX on this 8 hour test
flight, which covered the time period 72.43 ks to 96.47 ks UT.
Therefore, 200501201200UT, 200401210000UT and 200401211200UT sounding
are needed to cover the time period of this flight. These are shown
selected in Figure 7, and Figure 8 (below) shows the actual
soundings.
Once all
the values have been entered, the
Excel workbook should also be save as an Excel file,
MISSION_RAOBrangeAll.xls using
the
following steps:
- On the menu bar save the file using File/Save As
- In the Save As dialog
box,
change Save As Type to Microsoft Excel Workbook,
and click Save
This will save MISSION_RAOBrangeAll.xls.
It is useful as a final step to sort the radiosondes in the MISSION_RAOBs.RAOB2 file into
chronological order. (If they were saved chronologically this would not
be necessary, but invariably some soundings are not saved (operator
error!) and must be
added later after they are discovered missing. Believe me, this will
happen!) This is easily done on the RAOBman
Select tab by closing the
currently open RAOB2 file and opening the MISSION_RAOB.RAOB2. Then, on the Select tab depress the Search button. This brings all the
soundings into the Search
list box. Next, depress the Sort
button. This will sort the soundings chronologically. On the I/O tab Random RAOB Output frame Output File text box change the
name of the file to MISSION_RAOBs.RAOB2,
where the final small "s" indicates that the file has been sorted, and
select the New File Mode
option. Finally, on the Select
tab depress the Write button.
Previous Step | Next Step | Index |